Tutorial React + Flux + RxJS 22 Sep 2016
Hello everyone,
This is a very basic tutorial about React using the Flux architecture and RxJS. Let’s dive in !
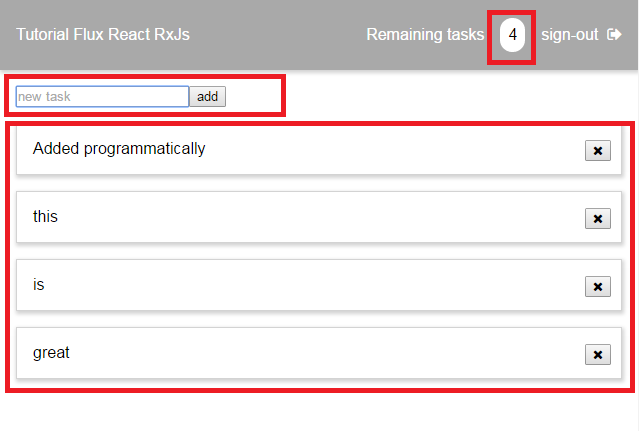
Here is what we are going to build :
The code can be found on Github here. Feel free to fork it :)
It is composed of 3 React components, a form to create a task, a task list and a badge in the header showing the number of tasks.
Flux
We will follow the flux architecture as defined by Facebook. To do so we will be using RxJS version 4.

The dispatcher
Let’s start by the dispatcher. It is really simple if you know a little bit RxJS. If not you could see this as a kind of eventBus. The dispatch method will send an event on the bus _actionSubject.
dispatch : function(action)
{
	_actionSubject.onNext(action);
}
Subscribers will be called if the action type correspond to the type parameter passed in the subscription. To do that we use the filter method that will give us a new kind of eventbus (observable) containing only the event of the right type. The subscriber can then subscribe to this new eventbus. Note that to keep the tutorial simple we did not implement any dispose/unregister mechanism.
subscribe : function(type, onAction)
{
	if (typeof onAction !== 'function')
        throw Error('Invalid action callback');

     var observable = _actionSubject
        .filter(function filterEvent(event)
        {
            return (typeof event === 'object') && event.type === type;
        });

    return observable.subscribe(onAction);
}
The form
The form is responsible for creating the tasks. The form is composed of a text field and a submit button. My form is listening for the onSubmit thanks to the props. Here is my render method.
render: function()
    {
        return (
            React.createElement('form',
                {
                    className: 'taskForm',
                    onSubmit: this.handleSubmit
                },

                React.createElement(
                    'input',
                    {
                        className: 'taskInput',
                        type: 'text',
                        placeholder: 'new task',
                        value: this.state.text,
                        onChange: this.handleTextChange
                    }
                ),
                React.createElement(
                    'input',
                    {
                        type: 'submit',
                        value: 'add',
                        className: 'taskSubmit',
                    })

            )
        );
    }
Now let’s have a look at the handleSubmit method. Note the e.preventDefault() to avoid really submitting the form. Here our javascript code is going to take care of things. Once the submit is pressed we send an action of type CREATE_TASK thanks to a dispatcher that was passed with the props this.props.dispatcher.dispatch(action);. Finally we clear the textfield by using the setState method this.setState({text: ''});
handleSubmit: function(e)
    {
        e.preventDefault(); //avoid real submit

        var id = Date.now();
        var action = {
          type : 'CREATE_TASK',
          task : {
            id: id,
            text : this.state.text
          }
        };

        this.props.dispatcher.dispatch(action);
        this.setState({text: ''});
    },
We add the form to the dom using ReactDOM and passing the dispatcher.
ReactDOM.render(
    React.createElement(taskCreateFormClass, {dispatcher : dispatcher}),
    document.getElementById('taskCreateForm')
);
The task store
To save our tasks we need a store. As my implementation is really basic it does need too much explanations. I create a function to build my taskStore. My store should be able to listen to actions and update its internal state as a consequence. This is done using the dispatcher subscribe method dispatcher.subscribe();. It means the store will listen to CREATE_TASK and DELETE_TASK events and trigger the appropriate method for each case.
var TaskStore = function(dispatcher)
{
    var store = [];

    var listeners = [];

    var addTask = function(e)
    {
        var task= e.task;
        store.push(task);
        console.log('Task added to store: ' + task.text);
		dispatcher.dispatch({type : 'TASK_STORE_UPDATED', tasks : store});
    };

    var removeTask = function(e)
    {
        var task= e.task;
        store.splice(store.indexOf(task), 1);
        console.log('Task removed from store: ' + task.text);
        dispatcher.dispatch({type : 'TASK_STORE_UPDATED', tasks : store});
    };

    dispatcher.subscribe('CREATE_TASK', addTask);
    dispatcher.subscribe('DELETE_TASK', removeTask);

    return {

    };
};

var taskStore = new TaskStore(dispatcher);
Task list
Now the task list should display all our tasks. To do so, our task list will listen to a TASK_STORE_UPDATED event sent by the store. Noet that we could have implemented this differently registering a callback to the taskstore directly inside the view. I prefer this implementation so that the task list does not know about the taskstore. The only dependency is on the dispatcher. This could be problematic though if stores start calling themselves, but this is out of the scope of this tutorial.
My task list will be composed of a list of taskNode
return (
            React.createElement('div',
                {
                    className: 'taskList'
                },
                taskNodes
            )
        );
We will build the list of task nodes using the map function on the state.tasks that will create a new array filled with React elements. Each node is just a div containing the text of the task and a button to delete it.
var that = this;
var taskNodes = this.state.tasks.map(function(task)
{
    var onDelete = function()
    {
        var action = {
          type : 'DELETE_TASK',
          task : task
        };
        that.props.dispatcher.dispatch(action);
    };

    return React.createElement(
        'div',
        {
            className: 'task',
            key: task.id,
        },
        task.text,
        React.createElement('Button',
            {
                className: 'taskDeleteButton',
                onClick: onDelete
            },
            React.createElement('i',
            {
                className: 'fa fa-close'
            }))
    );
});
The state.tasks is updated by listening to the TASK_STORE_UPDATED event. We subscribe to this event after the componentDidMount. We then simply call the setState method to re-render the view everytime we receive the TASK_STORE_UPDATED event. Note that React is smart and will only update the part of the dom that has changed, which is why React it is so efficient.
getInitialState: function()
{
    return {
        tasks: []
    };
},

componentDidMount: function()
{
    this.props.dispatcher.subscribe('TASK_STORE_UPDATED', this._onTaskStoreUpdated);
},

_onTaskStoreUpdated: function(e)
{
    this.setState(
    {
        tasks: e.tasks
    });
},
To delete the task we just need to dispatch a DELETE_TASK action as shown a little bit above, simply using onClick props.
The badge
The badge is very very simple. It is simply a div with a number inside this.state.tasks.length
render: function()
    {
        return (
            React.createElement('div',
                {
                    className: 'taskBadge'
                },
                this.state.tasks.length
            )
        );
    }
It reacts to the same event TASK_STORE_UPDATED as the task list view to be resfreshed.
getInitialState: function()
{
    return {
        tasks: []
    };
},

componentDidMount: function()
{
    this.props.dispatcher.subscribe('TASK_STORE_UPDATED', this._onTaskStoreUpdated);
},

_onTaskStoreUpdated: function(e)
{
    this.setState(
    {
        tasks: e.tasks
    });
}
Feel free to comment ! Hope this will be useful.