Building a GWT REST application with RestyGWT and Jersey 2.7 16 Mar 2014
Hi everyone,
In this post I will show you step by step how to build a GWT REST application using RestyGWT and Jersey.
The following code can be found on github https://github.com/ronanquillevere/gwtrestapp
To run the project:
mvn clean install
mvn gwt:run
Prerequisite
Setup a GWT maven project in eclipse
To do so I use the gwt-maven-plugin created by Thomas Broyer. You can either use it in a terminal following the following command
mvn archetype:generate -DarchetypeGroupId=org.codehaus.mojo -DarchetypeArtifactId=gwt-maven-plugin -DarchetypeVersion=2.6.0
Or you can do it directly inside eclipse. To do so create a new maven project.
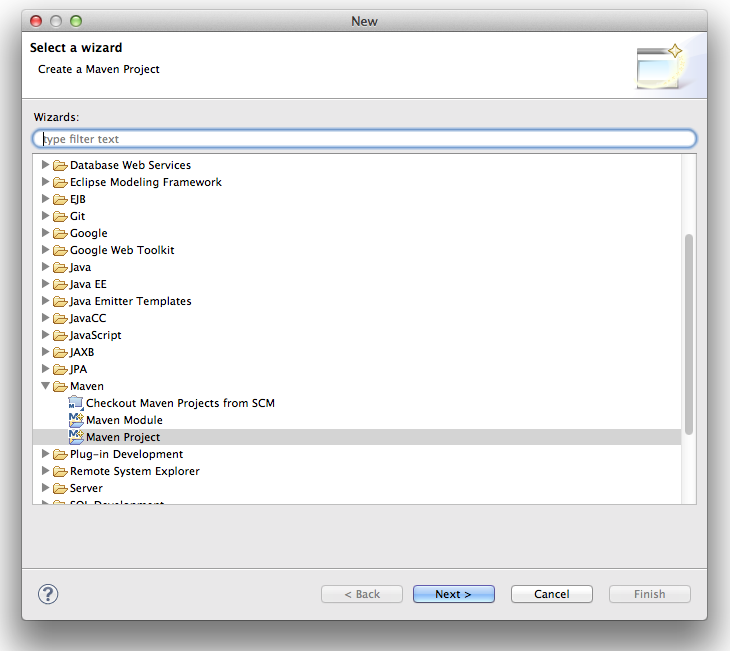
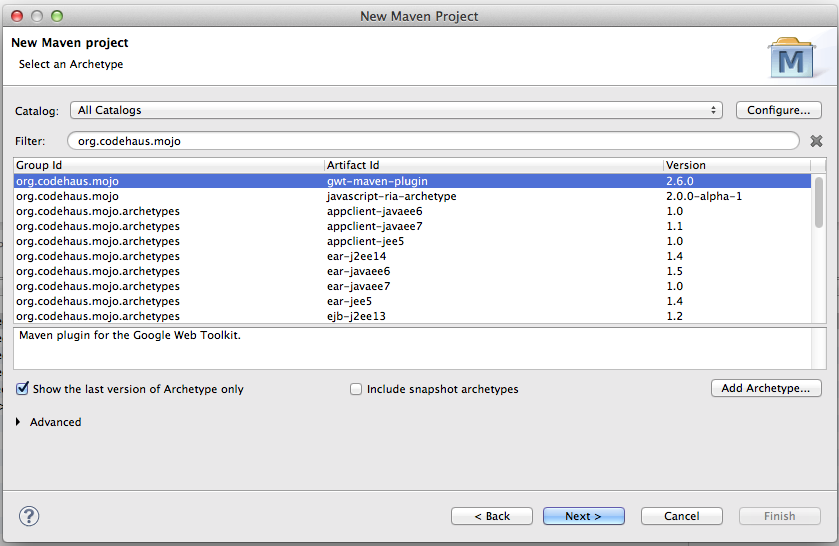
Select the folder where you want to create your project, then search for the gwt-maven-plugin. You might have to add it manually if it is the first time you use it (press Add Archetype...).
archetypeGroupId = org.codehaus.mojo
archetypeArtifactId = gwt-maven-plugin
archetypeVersion = 2.6.0
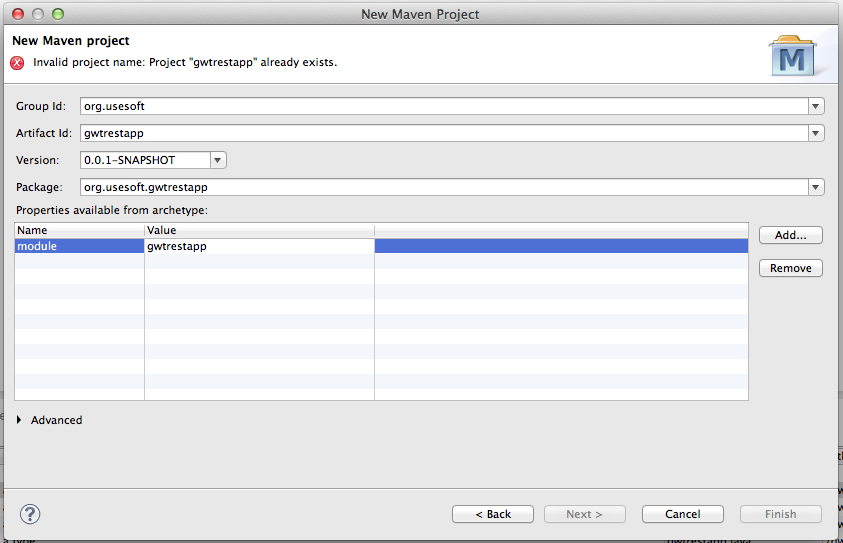
Then set your project properties, the module name will be the name of your eclipse project.
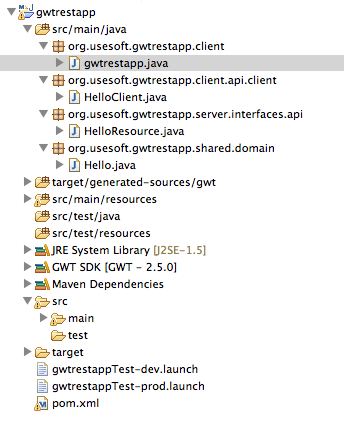
You should end up with the following project structure
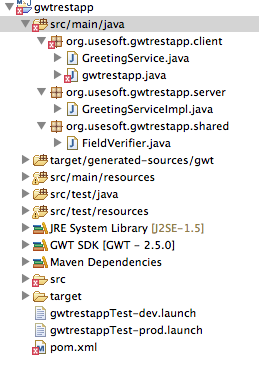
and the following errors

Clean the maven project
We will not need the code that has been automatically generated so just keep your entrypoint and erase all the other classes.
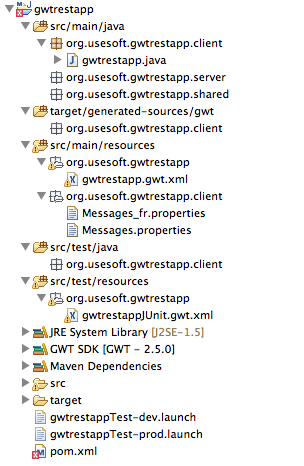
Also clean your entrypoint.
public class gwtrestapp implements EntryPoint {

  public void onModuleLoad() {

  }
}
Get rid of the errors
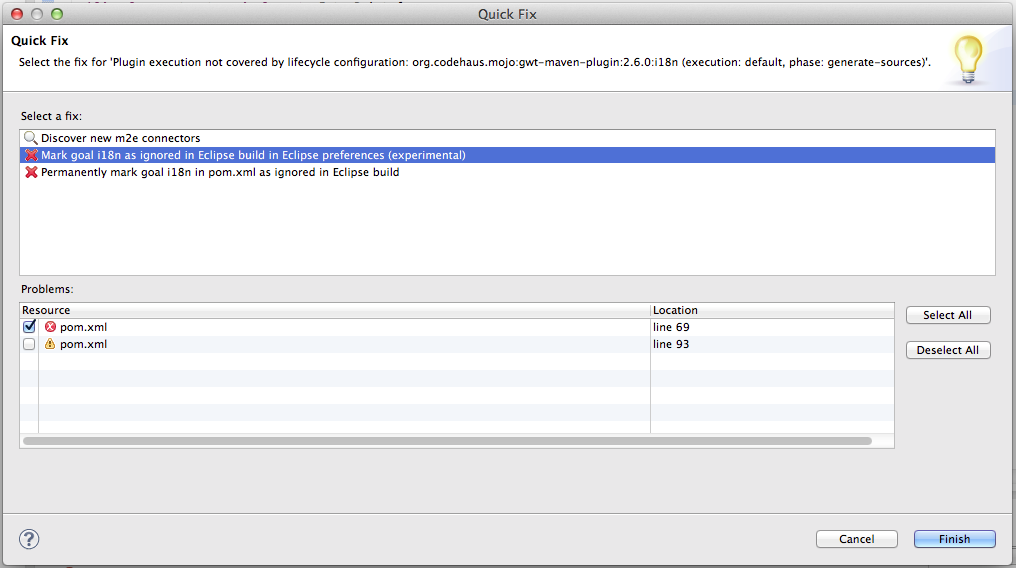
I hate errors, especialy in eclipse where I only want to see compile errors, so we will get rid of them. At this point you should only have one error. This error is due to the fact that the m2e maven eclipse plugin does not support all the plugin execution that are supported in maven. It is not a big deal. Just use quick fix ! Mark the goal as ignored for m2e inside eclipse.
Now you should not have any error. Nevertheless it is not finished yet. Let’s see if the server is running … Run as... Google application
Ok still some errors ! We need to clean the web.xml (src/main/webapp/WEB-INF/web.xml)
<?xml version="1.0" encoding="UTF-8"?>
<!DOCTYPE web-app
    PUBLIC "-//Sun Microsystems, Inc.//DTD Web Application 2.3//EN"
    "http://java.sun.com/dtd/web-app_2_3.dtd">
<web-app>

  <!-- Default page to serve -->
  <welcome-file-list>
    <welcome-file>gwtrestapp.html</welcome-file>
  </welcome-file-list>

</web-app>
You can also delete the gwt module that was created with the tests gwtXXXJUnit.gwt.xml and remove the inherits to Junit inside your app.gwt.xml
<?xml version="1.0" encoding="UTF-8"?>
<module rename-to='gwtrestapp'>
  <!-- Inherit the core Web Toolkit stuff.                        -->
  <inherits name='com.google.gwt.user.User' />

  <!-- Inherit the default GWT style sheet.  You can change       -->
  <!-- the theme of your GWT application by uncommenting          -->
  <!-- any one of the following lines.                            -->
  <inherits name='com.google.gwt.user.theme.standard.Standard' />
  <!-- <inherits name='com.google.gwt.user.theme.chrome.Chrome'/> -->
  <!-- <inherits name='com.google.gwt.user.theme.dark.Dark'/>     -->

  <!-- Other module inherits                                      -->

  <!-- Specify the app entry point class.                         -->
  <entry-point class='org.usesoft.gwtrestapp.client.gwtrestapp' />

  <!-- Specify the paths for translatable code                    -->
  <source path='client' />
  <source path='shared' />
</module>
Also clean your launch configuration and remove the reference to the gwtXXXJUnit module
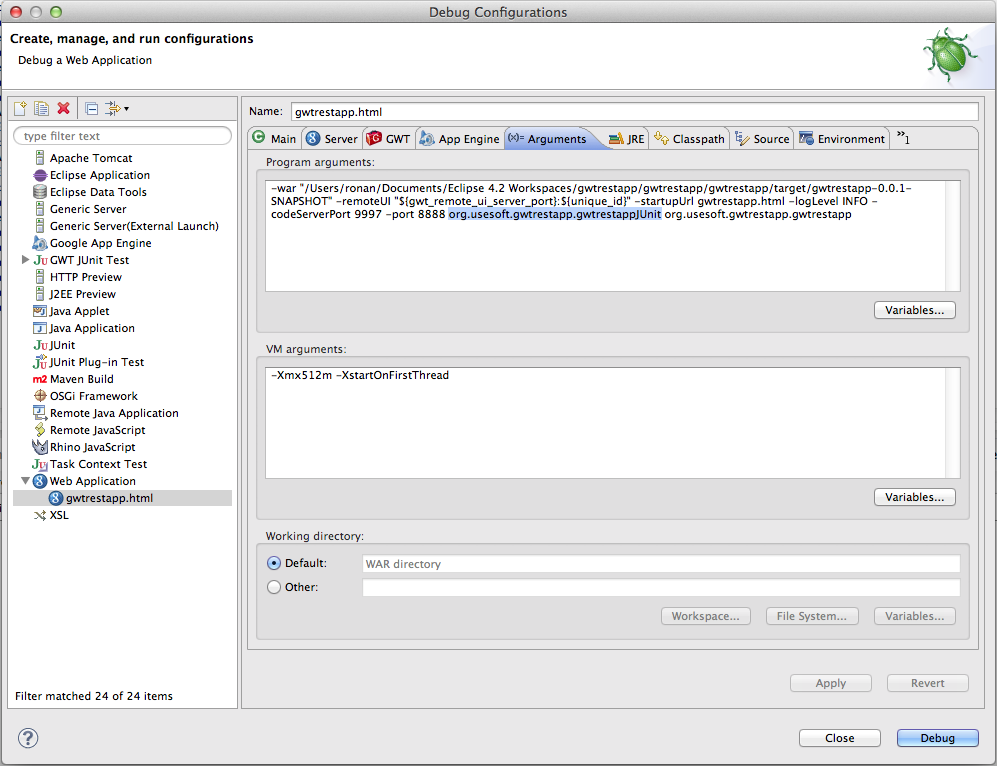
Last but not least you can clean your html page.
  <body>

    <!-- OPTIONAL: include this if you want history support -->
    <iframe src="javascript:''" id="__gwt_historyFrame" tabIndex='-1' style="position:absolute;width:0;height:0;border:0"></iframe>

    <!-- RECOMMENDED if your web app will not function without JavaScript enabled -->
    <noscript>
      <div style="width: 22em; position: absolute; left: 50%; margin-left: -11em; color: red; background-color: white; border: 1px solid red; padding: 4px; font-family: sans-serif">
        Your web browser must have JavaScript enabled
        in order for this application to display correctly.
      </div>
    </noscript>

  </body>
Now clean and install your project
mvn clean install
We should be good to go now !
Implement a JAX-RS backend using Jersey
First we will need to add the dependency on JAX-RS API.
pom.xml dependencies
<dependency>
    <groupId>javax.ws.rs</groupId>
    <artifactId>javax.ws.rs-api</artifactId>
    <version>2.0</version>
</dependency>
Then we need Jersey in our pom (The JAX-RS implementation). As of today, the latest version of Jersey is 2.7. As we are going to use an old version of Jetty, it does not implement the servlet 3.0 API so the dependency looks like this.
<dependency>
    <groupId>org.glassfish.jersey.containers</groupId>
    <!-- if your container implements Servlet API older than 3.0, use "jersey-container-servlet-core"  -->
    <artifactId>jersey-container-servlet-core</artifactId>
    <version>2.7</version>
</dependency>
For our json processing we want to use Jackson so we also add the following dependency
<dependency>
    <groupId>org.glassfish.jersey.media</groupId>
    <artifactId>jersey-media-json-jackson</artifactId>
    <version>2.7</version>
</dependency>
<dependency>
    <groupId>com.fasterxml.jackson.jaxrs</groupId>
    <artifactId>jackson-jaxrs-json-provider</artifactId>
    <version>2.3.2</version>
</dependency>
web.xml config
Now we need to configure Jersey to listen to the api calls. To do, as we will use a servlet container that only supports 2.x servlets, we will use the Servlet 2.x configuration method. So in your web.xml you need to add the following lines. Other configuration options are possible depending on the servlet container you use (glassfish, tomcat etc…). Have a look to the jersey manual
Warning put the name of the package where you will put your resources. Here I use org.usesoft.gwtrestapp.server.interfaces.api where I will put all my resources classes.
Also you can see that my servlet mapping is the following /api/*. It means that jersey will intercept all the calls that looks like /api/something and will try to serve them with a resource defined in the package described aboved using the @Path param (see below for more info).
<web-app>
...
    <servlet>
        <servlet-name>MyApplication</servlet-name>
        <servlet-class>org.glassfish.jersey.servlet.ServletContainer</servlet-class>
        <init-param>
            <param-name>jersey.config.server.provider.packages</param-name>
            <param-value>
                org.usesoft.gwtrestapp.server.interfaces.api
            </param-value>
        </init-param>
    </servlet>
    <servlet-mapping>
        <servlet-name>MyApplication</servlet-name>
        <url-pattern>/api/*</url-pattern>
    </servlet-mapping>
    ...
</web-app>
Writting your first resource
Below is an example of a Hello resource. I define its @Path as “hellos”. So everytime a call will look like /api/hellos this resource will be used to answer this call.
This resource returns some Hello object.
package org.usesoft.gwtrestapp.server.interfaces.api;

import java.util.Collection;
import java.util.HashMap;
import java.util.Map;

import javax.ws.rs.GET;
import javax.ws.rs.Path;
import javax.ws.rs.PathParam;
import javax.ws.rs.Produces;

import org.usesoft.gwtrestapp.shared.domain.Hello;

@Path("hellos")
public class HelloResource {

  Map<String, Hello> database;
  public HelloResource() {
    database = new HashMap<String, Hello>();
    Hello hello1 = new Hello("1", "ronan");
    Hello hello2 = new Hello("2", "john");

    database.put(hello1.getId(), hello1);
    database.put(hello2.getId(), hello2);
  }

  @GET
  @Produces("application/json")
  public Collection<Hello> get() {
    return database.values();
  }

  @GET
  @Path("/{id}")
  @Produces("application/json")
  public Hello getHello(@PathParam("id") String id) {
    return database.get(id);
  }
}
The corresponding Hello object. It is defined into the shared package to be accessible in the client and in the backend. Note that the jackson annotations are ‘codehaus’ one because restyGWT does not support ‘fasterxml’ version right now.
package org.usesoft.gwtrestapp.shared.domain;

import org.codehaus.jackson.annotate.JsonCreator;
import org.codehaus.jackson.annotate.JsonProperty;

public class Hello {
  private final String id;
  private final String name;

  @JsonCreator
  public Hello(@JsonProperty("id") String id, @JsonProperty("name") String name) {
    this.id = id;
    this.name = name;

  }

  public String getId() {
    return id;
  }

  public String getName() {
    return name;
  }
}
Now you can launch your GWT application. Call the following url:
http://127.0.0.1:8888/api/hellos
It will answer
[{"id":"1","name":"ronan"},{"id":"2","name":"john"}]If you want to access a specific hello, call the following url:
http://127.0.0.1:8888/api/hellos/1
It will answer
{"id":"1","name":"ronan"}Implement a REST client using RestyGWT
Now it is time to code hour client with GWT and RestyGWT. It will see it will be very very easy !
pom.xml dependencies
Add RestyGWT dependency in your pom.
<dependency>
    <groupId>org.fusesource.restygwt</groupId>
    <artifactId>restygwt</artifactId>
    <version>1.4</version>
</dependency>
GWT module file config
Add RestyGWT to you GWT module file
<inherits name="org.fusesource.restygwt.RestyGWT"/>Implement your client
We are going to define a rest interface so that RestyGWT will be able to generate the client code
package org.usesoft.gwtrestapp.client.api.client;

import java.util.List;

import javax.ws.rs.GET;
import javax.ws.rs.Path;
import javax.ws.rs.PathParam;

import org.fusesource.restygwt.client.MethodCallback;
import org.fusesource.restygwt.client.RestService;
import org.usesoft.gwtrestapp.shared.domain.Hello;

@Path("/api/hellos")
public interface HelloClient extends RestService {

  @GET
  public void getHellos( MethodCallback<List<Hello>> callback);

  @GET
  @Path("/{id}")
  public void getHellos(@PathParam("id") String id, MethodCallback<List<Hello>> callback);
}
Then to use the client, in the entry point I coded the following
package org.usesoft.gwtrestapp.client;

import java.util.List;

import org.fusesource.restygwt.client.Defaults;
import org.fusesource.restygwt.client.Method;
import org.fusesource.restygwt.client.MethodCallback;
import org.usesoft.gwtrestapp.client.api.client.HelloClient;
import org.usesoft.gwtrestapp.shared.domain.Hello;

import com.google.gwt.core.client.EntryPoint;
import com.google.gwt.core.client.GWT;
import com.google.gwt.user.client.ui.Label;
import com.google.gwt.user.client.ui.RootLayoutPanel;
import com.google.gwt.user.client.ui.VerticalPanel;

public class gwtrestapp implements EntryPoint {

  public void onModuleLoad() {

  Defaults.setServiceRoot(GWT.getHostPageBaseURL());

  HelloClient client = GWT.create(HelloClient.class);

  client.getHellos(new MethodCallback<List<Hello>>() {

    public void onSuccess(Method method, List<Hello> response) {
      VerticalPanel panel = new VerticalPanel();
      for (Hello hello : response) {
        Label label = new Label(hello.getName());
        panel.add(label);
      }
      RootLayoutPanel.get().add(panel);
    }

    public void onFailure(Method method, Throwable exception) {
      Label label = new Label("Error");
      RootLayoutPanel.get().add(label);
    }
  });
  }
}
Here is the result in firefox

The structure of my project